• Skip to main content
  • Skip to primary sidebar
  • Skip to footer

Sprouts And Krauts

Raw foods, fermentation, and all things vegan!

  • Home
  • Recipes
  • About
  • Portfolio
  • Contact

Recipes

Sprouted Buckwheat Breakfast Bowl

January 17, 2019 by Alana

With the start of a new year often comes a renewed desire to implement healthy eating habits. Well, this Sprouted Buckwheat Breakfast Bowl is a perfect start to a healthy day! This recipe uses buckwheat, which looks and acts like a grain but is actually a fruit seed. It also happens to be gluten-free, which makes it a great grain substitute for people with allergies or sensitivities. A good source of protein, fiber, and magnesium, as well as health-promoting flavonoids, buckwheat is a fabulous ingredient to incorporate into your everyday cooking.

Sprouted Buckwheat

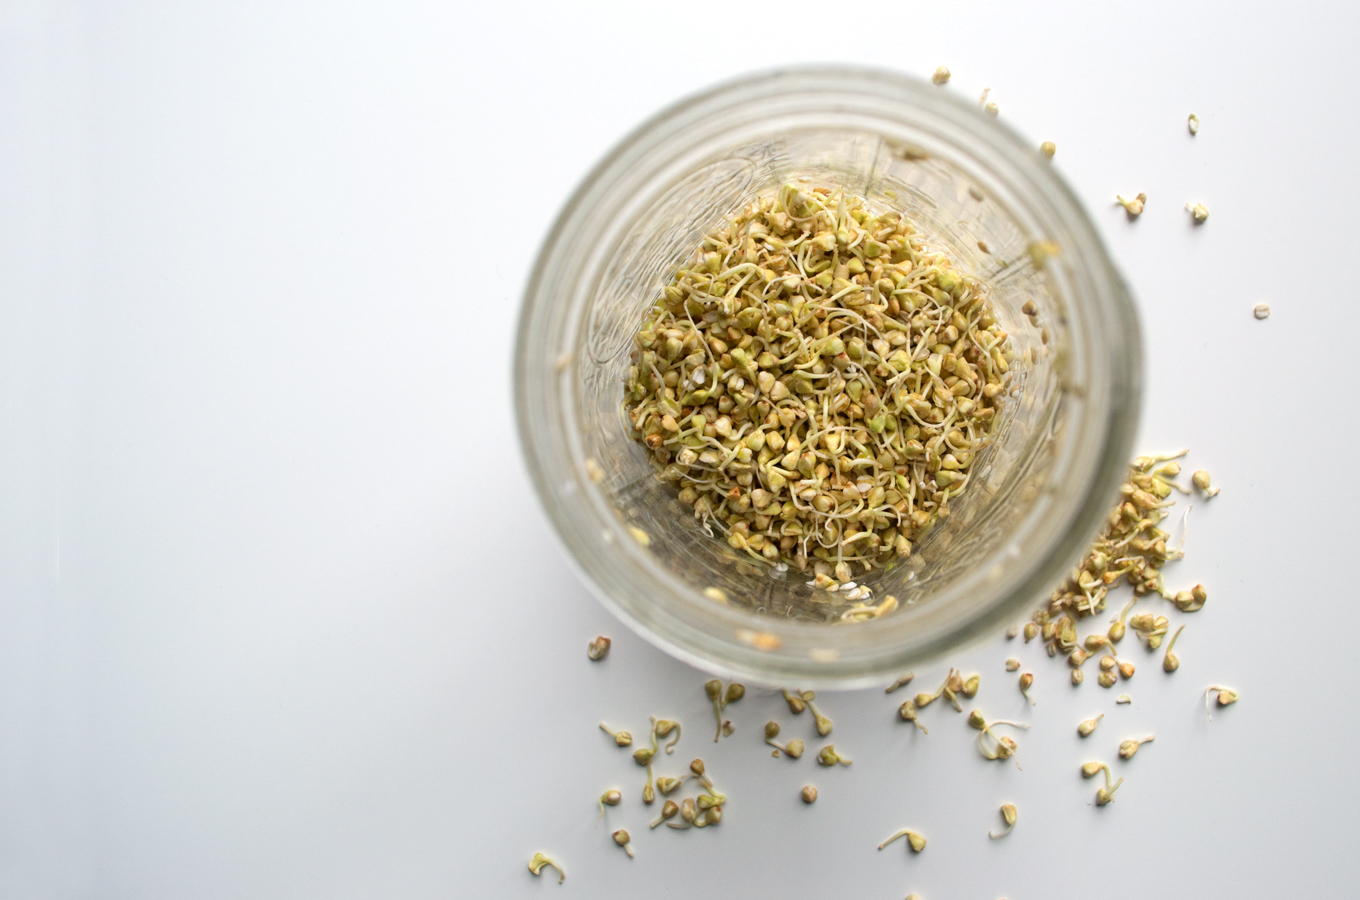
Sprouting is a wonderful way to increase the nutritional value of nuts, seeds, grains, and legumes, while also helping to improve digestibility. Though it may seem intimidating, sprouting is actually quite easy to do at home. All you need is a mason jar! A sprouting screen to cover the lid is ideal, but you could get away with using a piece of cheesecloth instead.

Sprouted Buckwheat Breakfast Bowls

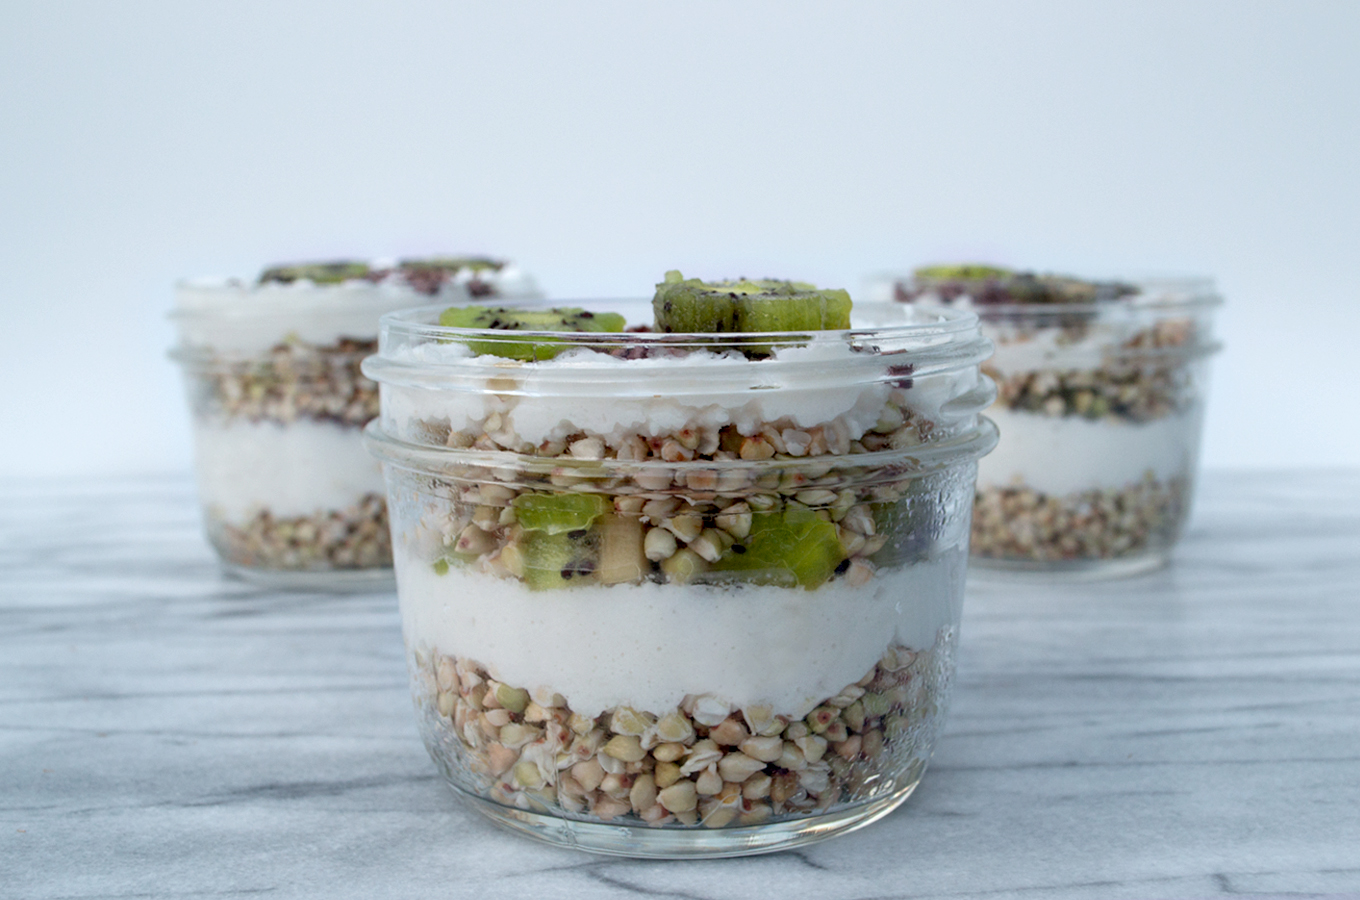
Aside from the time it takes for the sprouting magic to happen, this Sprouted Buckwheat Breakfast Bowl is actually a simple recipe to whip up. What I love most about it is the fact that it’s so versatile. I’m using kiwi fruit in this recipe because I’m lucky enough to have a surplus from a large kiwi harvest last month, but you can swap this out for any fruit you’d like. Apples or pomegranate seeds would be equally tasty here, and during the summer months this would be a perfect opportunity for ripe berries to shine.

Sprouted Buckwheat Breakfast Bowls

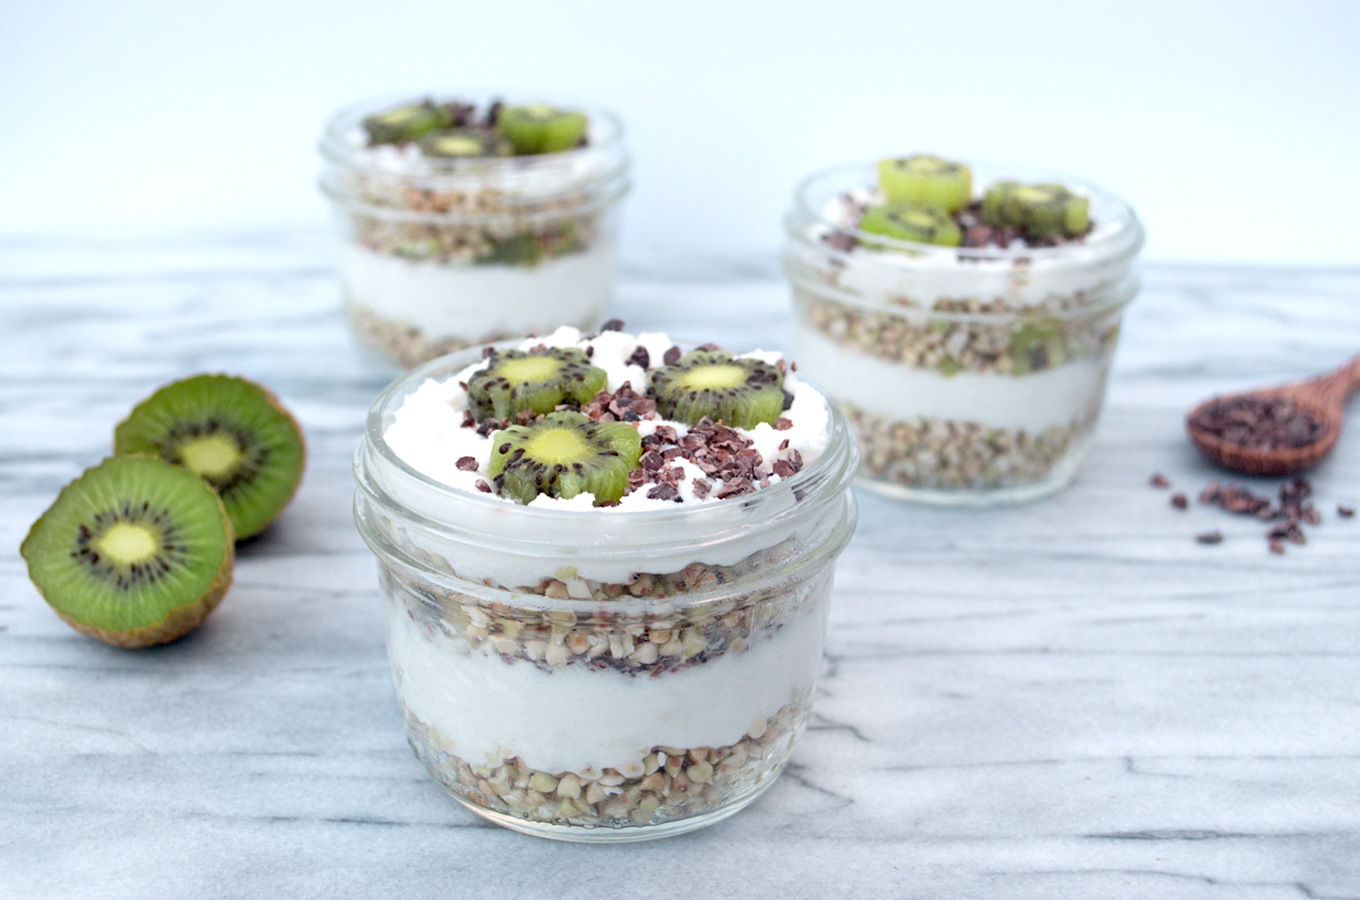
Not only is this Sprouted Buckwheat Breakfast Bowl healthy and simple to make, but it’s perfect to bring with you when you’re on the go. I love making meals in mason jars because I can simply twist on a lid and take my meal with me. The combination of slightly sweet and nutty buckwheat, luscious coconut cream, and tart and tangy kiwi fruit makes for a perfect breakfast that packs a nutritional punch.

Print
clock clock icon cutlery cutlery icon flag flag icon folder folder icon instagram instagram icon pinterest pinterest icon facebook facebook icon print print icon squares squares icon
Sprouted Buckwheat Breakfast Bowls

Sprouted Buckwheat Breakfast Bowl

  • Author: Alana Haldan
  • Prep Time: 20 minutes
  • Total Time: 48 hours 20 minutes
  • Yield: 4 servings 1x
  • Category: Breakfast
Print
Pin

Description

Though buckwheat looks and acts like a grain, it’s actually a fruit seed. It also happens to be gluten-free, which makes it a great grain substitute for people with allergies or sensitivities. A good source of protein, fiber, and magnesium, buckwheat is a fabulous ingredient to incorporate into your everyday cooking. The combination of slightly sweet and nutty buckwheat, luscious coconut cream, and tart and tangy kiwi fruit makes for a perfect breakfast that packs a nutritional punch.


Scale

Ingredients

  • 1 cup unsweetened shredded coconut
  • 1 cup water
  • 2 tsp maple syrup
  • 1 lime, juiced
  • 1 cup raw buckwheat groats, sprouted (see note)
  • 4 kiwis, peeled and sliced
  • 2 Tbsp cacao nibs

Instructions

  1. In a high-speed blender, combine shredded coconut, water, maple syrup, and lime juice. Blend until completed combined and creamy, about 3 to 4 minutes, stopping to scrape down sides of blender as needed.
  2. Equally divide coconut cream and sprouted buckwheat among four bowls. Top with kiwi slices and cacao nibs.

Notes

Though sprouts can be intimidating to prepare, they are actually relatively simple (albeit time-consuming) to make. Allow 48 to 72 hours to prepare these sprouted buckwheat groats. If you don’t have the time to sprout, you can simply soak the buckwheat overnight then drain and rinse well before eating. To prepare the sprouts, use a quart sized mason jar covered with a fine mesh screen or cheesecloth. First rinse the buckwheat very well in cool water, then soak in water in the mason jar for 30 minutes. After soaking, rinse and drain very well. Invert the jar and place at an angle to allow excess water to drain. Continue the rinsing and draining process at least twice a day for about 36 to 48 hours. You will see the sprout tail begin to appear and at this point they are ready to be used. After a final rinse, drain well and let sit another 8 to 12 hours to ensure they are as dry as possible. Once the sprouting process has finished, any unused sprouts can be stored in a closed container in the refrigerator for another couple of days.

Did you make this recipe?

Tag @sproutsandkrauts on Instagram

Filed Under: Breakfast, Recipes

Beet Tartare

September 26, 2018 by Alana

When I first transitioned to a vegan diet, I found myself craving the flavors of a traditional ahi tuna tartare. Since I was also just beginning my journey as a Natural Chef, I challenged myself to create a vegan version of this dish that I would be able to enjoy. Ultimately, I came up with this Beet Tartare with Avocado-Lime Cream and Black Tahini. Cubed and steamed beets mimic the appearance and texture of ahi tuna, and soak up the flavors of the marinade wonderfully. This beet tartare recipe is near and dear to my heart because it’s one of the first recipes that I developed as a student at Bauman College.

Beet Tartare Appetizer

Image by Bauman College

Sharpen Your Knives…

This is a perfect recipe to show off your knife skills! For best results, make sure you start off with a well-sharpened knife and large beets. To end up with perfectly cubed beets, you first need to cut off the round ends and sides of the beet to create a square or rectangular shape. You’ll end up with some excess beet scraps that are perfect to use in a fresh-squeezed juice. Once you have the beet squared off, cut it into 1/2″ slices. Then cut each slice into 1/2″ strips, and each strip into 1/2″ cubes. This video demonstrates the process quite well. You don’t need to worry too much about each cube being perfect, because they will still end up tasting delicious regardless of their shape!

Image by Bauman College

When it comes to serving, this beet tartare recipe is quite versatile. Although I designed this recipe to be served as a one-bite appetizer, it works equally well as a small salad, served over your favorite greens and drizzled with the avocado-lime cream and black tahini sauce. To create a stunning presentation, I used a mandoline to cut thin slices of watermelon radish. After quick pickling them, I drained and blotted them, then layered them on a serving platter to provide a colorful backdrop.

Image by Bauman College

Print
clock clock icon cutlery cutlery icon flag flag icon folder folder icon instagram instagram icon pinterest pinterest icon facebook facebook icon print print icon squares squares icon
Beet Tartare Close Up

Beet Tartare With Avocado-Lime Cream and Black Tahini

  • Author: Alana Haldan
  • Prep Time: 45 minutes
  • Cook Time: 15 minutes
  • Total Time: 2 hours
  • Yield: 48 pieces 1x
Print
Pin

Description

Marinated beets serve as a creative stand-in for Ahi tuna in this vegan take on a traditional tartare. The silky avocado cream is a perfect counterpoint to the flavorful marinated beets. Using toothpicks for serving make this recipe a unique and delicious choice for passed appetizers.


Scale

Ingredients

Beets

  • 2 large beets, peeled and medium diced
  • 2 1/2 limes, juiced
  • 2 Tbsp rice vinegar
  • 2 Tbsp sesame oil
  • 2 Tbsp tamari

Avocado-Lime Cream

  • 1 medium avocado, diced
  • 1/2 bunch cilantro,roughly chopped
  • 1 lime, juiced
  • 1 tsp fresh grated ginger
  • 1/8 tsp sea salt

Black Tahini Sauce

  • 1/4 cup black tahini
  • 1/8 tsp sea salt
  • 1/8 tsp garlic powder

Instructions

  1. Place steamer basket and 1 inch filtered water in a medium pot. Bring water to a boil, add beets, and cover pot. Reduce heat to a simmer and steam until beets are tender yet firm, about 10 to 15 minutes.
  2. In a medium bowl, add lime juice, rice vinegar, sesame oil, and tamari and mix to combine. Add beets and refrigerate at least 1 hour.
  3. While beets marinate, prepare avocado cream. In a food processor, combine avocado, cilantro, lime juice, and fresh ginger and process until mixture is very smooth and creamy. Transfer to a squeeze bottle and set aside.
  4. In a small bowl, combine black tahini, salt, and garlic powder. Whisk well to combine. Transfer to a squeeze bottle and set aside.
  5. To serve, drain excess marinade from beets and pat dry with a paper towel. Squeeze about 1/4 tsp of avocado-lime cream on top of each beet cube then drizzle with black tahini sauce. Insert toothpick into center of each beet cube.
  6. Alternatively, serve in small serving soup spoons. Squeeze about 1/4 tsp of black tahini sauce in spoon, then top with a beet cube. Squeeze about 1/4 tsp of avocado-lime cream on beet, then top with an additional drizzle of black tahini sauce.

Did you make this recipe?

Tag @sproutsandkrauts on Instagram

Filed Under: Appetizers, Recipes

Cold Brew Coffee Popsicles

August 25, 2018 by Alana

When the weather is hot and you need a pick-me-up, there’s nothing better than these Cold Brew Coffee Popsicles. With all of the hot weather we’ve been having this summer, I’ve really been on a popsicle kick lately. And with the end of summer now looming in the distance, I want to enjoy as many ice cold desserts as possible while I still can!

After making these Preserved Lemon Coconut Cream Pops at the start of the summer, I was hooked. Once you have the popsicle molds, the process is so simple! I’ve been having lots of fun this season playing around with different flavors.

Cold Brew Coffee Popsicles Ingredients

Since I’ve also developed a love for cold brew coffee lately, I decided to use that as a base for these delicious popsicles. With only six ingredients, they are so easy to put together. Simply blend, pour into your molds, and freeze. The next day you’ll have a wonderful cold treat waiting for you.

Cold Brew Coffee Popsicles

Cold brew coffee, almond milk, and vanilla extract serve as the basis for this popsicle. A bit of blended up chia acts as a thickener, while the addition of cacao nibs adds a nice crunch. The thing I love most about these popsicles is the fact that they’re sweetened with dates instead of sugar. This gives you an amazing sweetness while having the added benefit of containing fiber, vitamins, and minerals. In fact, recent studies have found that dates are rich in antioxidants and anti-cancer compounds. I’ll choose that over regular sugar any day!

Cold Brew Coffee Popsicle Melting

Print
clock clock icon cutlery cutlery icon flag flag icon folder folder icon instagram instagram icon pinterest pinterest icon facebook facebook icon print print icon squares squares icon
Cold Brew Coffee Popsicle Melting

Cold Brew Coffee Popsicles

  • Author: Alana Haldan
  • Prep Time: 5 minutes
  • Total Time: 6 hours 5 minutes
  • Yield: 6 popsicles 1x
  • Category: Dessert
Print
Pin

Scale

Ingredients

  • 3/4 cup plain unsweetened almond milk (I used Califia Farms Unsweetened Almondmilk)
  • 3/4 cup vanilla cold brew coffee concentrate (I used Chameleon Cold-Brew Vanilla Concentrate)
  • 6 medjool dates, pitted and roughly chopped
  • 2 Tbsp chia seeds
  • 1 Tbsp vanilla extract
  • 1/4 cup cacao nibs

Instructions

  1. Combine cold brew coffee, almond milk, dates, chia seeds, and vanilla extract in a blender. Blend on medium-high about 1 to 2 minutes, until well combined, pausing to scrape down sides as needed.
  2. Place mixture in a medium bowl and let sit until thickened, about 10 to 15 minutes.
  3. Add cacao nibs, stirring well to combine.
  4. Divide evenly among 6 ice pop molds and place into freezer. Once mixture is slightly frozen, after about 30 to 45 minutes, insert popsicle sticks. Continue freezing until completely solid, at least 6 hours or overnight.
  5. To remove cream pops from molds, run molds under warm water for 5 to 10 seconds to help release the cream pops. Eat immediately or return to freezer for storage.

Did you make this recipe?

Tag @sproutsandkrauts on Instagram

Filed Under: Dessert, Recipes

Garbanzo Beet Veggie Burger

July 26, 2018 by Alana

A good burger is one of those summertime staples that evokes so much nostalgia, but they’ve often been either out of reach or simple unsatisfying for those of us who don’t eat meat. These days, us vegans are lucky to have a ton of different pre-made veggie burger options available at our fingertips. However, these are often very processed and full of unnecessary ingredients. As a Natural Chef, I always love to make my food from scratch, so I created this delicious Garbanzo Beet Veggie Burger to satisfy my burger craving!

Garbanzo Beet Veggie Burger ingredients

What About Protein?

Having been vegan for over a year now, I’ve gotten quite used to people wondering where my protein comes from. I’m always happy to debunk the common misconception that people need to consume animal products in order to get enough protein in their diets. The fact of the matter is that plants are wonderful sources of protein! When I developed this Garbanzo Beet Veggie Burger, I made sure to include a variety of protein-rich whole food ingredients.

Garbanzo Beet Veggie Burger Patties Uncooked

Garbanzo beans, sunflower seeds, and rice are all high-quality protein sources. Additionally, Forbidden rice (a deep purple heirloom rice variety) is extremely high in anthocyanins, which help protect against free radical damage. The ground flax seeds, in addition to acting as a binder, are a great source of omega-3 fatty acids. Oats and beets are both great sources of dietary fiber. Not only are these Garbanzo Beet Veggie Burgers delicious, but they are also nutritional powerhouses.

Garbanzo Beet Veggies Burger Patties Cooked

Powdered crimini mushrooms are the secret ingredient in these Garbanzo Beet Veggie Burgers. Dried mushrooms, ground into a powder in a spice grinder, help pack an umami punch to this meal. Additionally, grated beets lend an earthy flavor and dramatic hue to these beautiful burger patties.

Garbanzo Beet Veggie Burger Patties Stack

These delicious burgers are truly a vegan dream come true! They’re wonderful served on a bun or lettuce wrap, or simply chopped up on top of a salad. The best part is that they’re hearty enough to stand up to all your favorite toppings. Personally, I love my Garbanzo Beet Veggie Burger topped with whole grain mustard, greens, and some tangy sauerkraut or kimchi.

Garbanzo Beet Veggie Burger

Print
clock clock icon cutlery cutlery icon flag flag icon folder folder icon instagram instagram icon pinterest pinterest icon facebook facebook icon print print icon squares squares icon
Garbanzo Beet Veggie Burger

Garbanzo Beet Veggie Burger

  • Author: Alana Haldan
  • Prep Time: 25 minutes
  • Cook Time: 45 minutes
  • Total Time: 1 hours 10 minutes
  • Yield: 6 patties 1x
  • Category: Main
Print
Pin

Description

Powdered crimini mushrooms are the secret to imparting a delicious umami flavor in these veggie burgers. Filled with beans, whole grains, and seeds, these burgers are loaded with protein and are full of flavor. The grated beet and forbidden rice lend a dramatic hue to these beautiful burger patties. You can serve on a traditional bun, make a lettuce wrap, or even make miniature patties to serve as appetizers.


Scale

Ingredients

  • 1 Tbsp olive oil
  • 1 onion, finely diced
  • 2 tsp sea salt, divided
  • 4 cloves garlic, minced
  • 1/4 cup plus 1 Tbsp water
  • 2 Tbsp ground flax seed
  • 1 cup cooked garbanzo beans
  • 2 cups cooked Forbidden rice (see note)
  • 1/2 cup finely grated beet
  • 1 cup sunflower seeds
  • 1/2 cup gluten free rolled oats
  • .5 oz dried crimini mushrooms, powdered in spice grinder or food processor
  • 3 Tbsp nutritional yeast
  • 2 tsp oregano
  • 2 tsp smoked paprika
  • 1 tsp chipotle powder
  • 1/4 cup tomato paste
  • 2 Tbsp coconut aminos
  • 1 Tbsp chickpea miso

Instructions

  1. Preheat oven to 375° F.
  2. In a medium pan, heat olive oil over medium heat. When oil shimmers, add onions and 1/2 tsp of the salt. Cook, stirring often, until onion is softened and translucent, about 5 minutes. Add garlic, stirring often until fragrant, about 1 minute more. Remove from heat and set aside.
  3. In a small bowl, add water and flax seeds and stir to combine. Set aside until mixture has thickened, about 5 minutes.
  4. In a large bowl, add garbanzo beans and roughly mash with a potato masher until most beans are crushed but some chunks remain.
  5. Add rice, beet, and reserved onion and garlic to the garbanzo beans and stir well to combine.
  6. In a food processor, add sunflower seeds and pulse several times until coarsely chopped. Add rolled oats and pulse several more times. Mixture should still be chunky and not powdery. Add to garbanzo bean mixture and stir well to combine.
  7. In a small bowl, mix mushroom powder, nutritional yeast, oregano, smoked paprika, chipotle powder, and remaining 1 1/2 tsp salt, stirring well to combine. Add to garbanzo bean mixture and mix well to incorporate.
  8. In a medium bowl, add tomato paste, coconut aminos, and chickpea miso. Whisk well until combined, then add to garbanzo bean mixture. Add reserved flax mixture and mix very well until wet ingredients are well incorporated.
  9. Form dough into 6 patties and place on a parchment-lined baking sheet. Bake for 40 to 45 minutes, until patties are firm and exterior is slightly crispy.

Notes

This recipe calls for Forbidden rice, which is an heirloom variety of rice with a very deep purple color. If you can’t find this variety, brown rice can be substituted.

Did you make this recipe?

Tag @sproutsandkrauts on Instagram

Filed Under: Main Course, Recipes

Preserved Lemons Coconut Cream Pops

July 10, 2018 by Alana

This past Spring, I was lucky enough to have an overabundance of Meyer lemons growing in my garden, so I decided to try my hand at making preserved lemons.

preserved lemons process

What Are Preserved Lemons?

Preserved lemons are a traditional ingredient used in Moroccan and Middle Eastern cooking. Essentially, preserved lemons are lemons that have been pickled in salt and their own juices. The simple preserving process involves quartering the lemons, rubbing them with salt, then packing them into jars. I used this recipe from Nourished Kitchen as a general guideline. The most important ingredient is patience, since the lemons need to ferment at room temperature for about a month.

It took some willpower to let them sit uneaten for that long, but I am now the proud owner of one gallon of delicious preserved lemons! If you ask me, lemons are always a standout ingredient, but preserving them really amps up their flavor to another level. The sourness of the lemons becomes more mellow during the fermentation process. You can use the peels in their entirety because they soften during the preservation process. Thus, the citrus oils found in the lemon peels provide an explosion of complex flavors.

preserved lemons in mason jar

Preserved Lemons For Dessert?!

Savory dishes, such as stews and tagines, often feature preserved lemons. However, I felt that a dessert could benefit from the addition of the unique tang of preserved lemons. With the summer heat in full effect, it’s now the perfect time for some cold treats, so I incorporated preserved lemons into these delicious cream pops!

preserved lemon cream pops tray

With only five ingredients, these vegan cream pops are super simple to whip up. The creaminess of coconut milk pairs wonderfully with the tart and tangy preserved lemons. If you don’t have a jar of preserved lemons already sitting in your refrigerator, find them at specialty food stores and markets, some grocery stores, or online.

preserved lemon cream pop outside

Print
clock clock icon cutlery cutlery icon flag flag icon folder folder icon instagram instagram icon pinterest pinterest icon facebook facebook icon print print icon squares squares icon
preserved lemon cream pop outside

Preserved Lemon Cream Pops

  • Author: Alana Haldan
  • Prep Time: 5 minutes
  • Cook Time: 10 minutes
  • Total Time: 6 hours 15 minutes
  • Yield: 6 cream pops 1x
  • Category: Dessert
Print
Pin

Description

Preserving lemons amps up their flavor to a whole other level. Here, the citrus oils from the softened lemon peels provide an explosion of complex flavors. Coconut milk provides a wonderfully creamy base for these vegan cream pops. With only 5 ingredients, they’re super simple to whip up and are a perfect cold treat for a hot summer day.


Scale

Ingredients

  • 1 (13.5-ounce) can unsweetened full fat coconut milk
  • 3/8 cup cassava syrup (see notes)
  • 2 tablespoons lemon juice
  • 1 tablespoon arrowroot
  • 3/8 cup rinsed and finely chopped preserved lemon

Instructions

  1. In a medium saucepan over medium heat, whisk together coconut milk, cassava syrup, and lemon juice. Heat until melted and well combined, about 2 minutes.
  2. Remove about 1/2 cup of the coconut milk mixture and place in a small bowl. Add arrowroot to bowl, whisking well until completely incorporated. Slowly pour arrowroot mixture back into saucepan and stir well to incorporate into the coconut milk.
  3. Continue cooking over medium heat, whisking often, until mixture is thick enough to coat the back of a spoon, about 3 to 5 minutes. Pour mixture into a large bowl and set aside until cooled to room temperature, about 30 minutes.
  4. Add preserved lemon to coconut milk mixture and stir well to combine.
  5. Divide evenly among 6 ice pop molds and place into freezer. Once mixture is slightly frozen, after about 30 to 45 minutes, insert popsicle sticks. Continue freezing until completely solid, at least 6 hours or overnight.
  6. To remove cream pops from molds, run molds under warm water for 5 to 10 seconds to help release the cream pops. Eat immediately or return to freezer for storage.

Notes

Cassava syrup is a fructose-free sweetener that’s made from the root of the cassava plant. It can be found at many health food stores and online. If you can’t find cassava syrup, alternative sweeteners such as coconut syrup  can be used instead, but be aware that darker syrups will change the color of the final product.

Did you make this recipe?

Tag @sproutsandkrauts on Instagram

Filed Under: Dessert, Recipes

Welcome To Sprouts And Krauts!

June 26, 2018 by Alana

Hello, and welcome to Sprouts And Krauts! My name is Alana, and I’m a recent graduate of the Natural Chef program at Bauman College in Berkeley, California. I have a passion for vegan, plant-based cooking, fermentation, and raw foods.

Natural Chef Alana Haldan

Image by Bauman College

Before coming into the culinary world, I was a graphic designer, spending most of my time behind a computer. Despite thinking of myself as a healthy eater, in April 2017, I was feeling overweight, tired, and unmotivated. I made the decision to try a vegan diet and my life was forever changed. Not only have I lost over 20 pounds, but since becoming vegan, I have seen massive improvements to my own health, energy, and well-being.

After experiencing the benefits of a plant-based diet firsthand, I wanted to expand my knowledge of the topic. This is what brought me to Bauman College and into the world of food and nutrition. I was originally looking into several different nutrition consulting programs, but when I found out about the Natural Chef program at Bauman, I was intrigued. I didn’t know a program like this, combining culinary skills with holistic nutrition and health, even existed! [Skip to recipe]

Natural Chef Alana in the kitchen with mushrooms

Image by Milton Williams

Going through the Natural Chef program at Bauman College has been one of the most rewarding experiences of my adult life. We’ve covered so many interesting topics during this program, but perhaps the most fascinating has been everything I’ve learned about wild fermentation. I love experimenting with different ferments and sauerkrauts, and it was enlightening to learn about all the health benefits that fermented foods provide. Additionally, I have long been intrigued by raw foods and have been experimenting with sprouting and dehydrating for many years. I decided to create a recipe blog where I could combine these interests along with my love of vegan recipe development.

As a result, Sprouts And Krauts was born! I am excited to have a place to share my newfound knowledge with others. As a Natural Chef, my goal is to inspire and empower people to venture into the world of plant-based eating. I want to show that following a vegan diet can be easy, healthy, and delicious.

Chard plant from the garden

As a Natural Chef, I’ve learned how important it is to eat seasonally and locally. I’m lucky to live in Northern California, where beautiful weather and a thriving garden keep me rich with seasonal fruits and veggies throughout the year. But sometimes this bounty can lead to produce overload! Surely anyone with a garden can relate to the dilemma of suddenly having way more produce than they know what to do with.

I recently had this experience with the last of my rainbow chard harvest. While I love steamed or sautéed greens, I wanted to take the opportunity to try something new with the chard stems. Chard stems are often discarded because they can be a bit fibrous and tough. Not only does fermenting help to soften the stems, but it’s also a wonderful way to naturally preserve produce. Furthermore, the fermentation process gives the chard stems a wonderfully sour, tangy flavor. I love to use these chard stems as a substitute for sauerkraut or relish, or simply tossed on top of a salad or grain bowl.

Chard stems chopped on cutting board

With only three ingredients, this basic fermentation recipe couldn’t be simpler, and the beauty of it is the fact that it’s completely adaptable to whatever veggies you may have on hand. You can pick your favorites, or use whatever you’re currently harvesting from your own garden. Have fun adding spices and seasonings as you see fit. I’ve had wonderful results using this basic brine recipe for many different ferments, including garlic, radishes, hot peppers, and cauliflower. Just be sure to keep the salt to water ratio the same, but otherwise you can let your imagination be your guide. I’d love to hear what kind of ferments you come up with! Leave a comment to let me know.

Enjoy and check back soon for more vegan recipes featuring sprouts and krauts!

Fermented chard stems in mason jars

Print
clock clock icon cutlery cutlery icon flag flag icon folder folder icon instagram instagram icon pinterest pinterest icon facebook facebook icon print print icon squares squares icon
Fermented chard stems in mason jars

Fermented Chard Stems

  • Author: Alana Haldan
  • Prep Time: 45 minutes
  • Cook Time: 5 minutes
  • Total Time: 50 minutes
  • Yield: 1 half-gallon jar 1x
  • Category: Fermentation
  • Cuisine: American
Print
Pin

Description

Lacto-fermentation is a wonderful way to naturally preserve produce. The process makes use of Lactobacillus bacteria, which naturally exists on the surface of vegetables and is able to convert sugars into lactic acid. Lactic acid, along with being a natural preservative, is what gives fermented foods their wonderfully sour, tangy flavor. The health benefits of the chard stems are amplified by the fermentation process, making the existing minerals easier for the body to digest.


Scale

Ingredients

  • 5 cups water
  • 3 Tbsp plus 2 1/4 tsp sea salt
  • 7 cups roughly chopped chard stems

Instructions

  1. In a small pot, boil water, then combine with sea salt in a medium bowl. Stir periodically until salt is dissolved. Set aside until brine has cooled to room temperature.
  2. Add chard stems to a wide-mouth half-gallon jar, filling to the shoulder of the jar.
  3. Pour enough brine into the jar to cover the vegetables by 1 inch.
  4. Place Kraut Source or similar airlock device (see note) onto the jar. Place in a cool area away from direct sunlight and allow to sit for 7 to 14 days.
  5. Check daily to make sure the moat of the airlock is filled, and top off with water if needed.
  6. Periodically taste your ferment. Once you have reached your desired level of sourness, remove the Kraut Source, replace with a wide-mouth mason jar lid, and store in the refrigerator, where the ferment will last for several months.

Notes

The Kraut Source used in this recipe is available at www.krautsource.com. There are other similar airlock devices available on the market that can be used to seal the fermenting jar so that oxygen is kept out while allowing carbon dioxide to escape.

Did you make this recipe?

Tag @sproutsandkrauts on Instagram

Filed Under: Fermentation, Recipes

  • « Go to Previous Page
  • Go to page 1
  • Go to page 2
  • Go to page 3

Primary Sidebar

Hi, I’m Alana

Welcome to Sprouts And Krauts! I'm a vegan chef that loves creating recipes with seasonal ingredients.
Read More →

Let’s Connect

  • Email
  • Facebook
  • Instagram
  • LinkedIn
  • Pinterest

Join Me!

Sign up for my free email newsletter and receive
A Beginner's Guide To Going Vegan

Thank you!

You have successfully joined our subscriber list. Check your email to download your free guide.

.

Disclosure

Sprouts And Krauts is a participant in the Amazon Services LLC Associates Program, an affiliate advertising program designed to provide a means for sites to earn advertising fees by advertising and linking to Amazon.com

Footer

I'm a natural chef and food photographer with a passion for vegan, plant-based cooking, fermentation, and raw foods. I hope to inspire and empower others to venture into the world of plant-based eating, just as I did years ago. Read More →

Find Me On…

  • Email
  • Facebook
  • Instagram
  • LinkedIn
  • Pinterest

Subscribe

Sign up now to receive email updates and a FREE digital guide to help you on your vegan journey!

Copyright © 2023 · Foodie Pro & The Genesis Framework  |  Privacy Policy  |  Terms Of Use  |  Disclaimer