• Skip to main content
  • Skip to primary sidebar
  • Skip to footer

Sprouts And Krauts

Raw foods, fermentation, and all things vegan!

  • Home
  • Recipes
  • About
  • Portfolio
  • Contact

Recipes

Black Lentil Pomegranate Salad

November 13, 2019 by Alana

The holidays can be a challenging time to be a vegan, especially when other people are the ones hosting the festivities. Over the years, I’ve become quite accustomed to making a full meal out of side dishes. Luckily, the holiday gatherings I attend welcome me to bring a vegan dish to share. Nothing against green beans, mashed potatoes, and cranberry sauce, but I love to switch it up by adding new, nontraditional recipes into my holiday rotation each year. This Black Lentil Pomegranate Salad is a new favorite of mine that will definitely be making an appearance on my Thanksgiving table.

black lentil pomegranate salad on a serving platter

The Beauty of Black Lentils

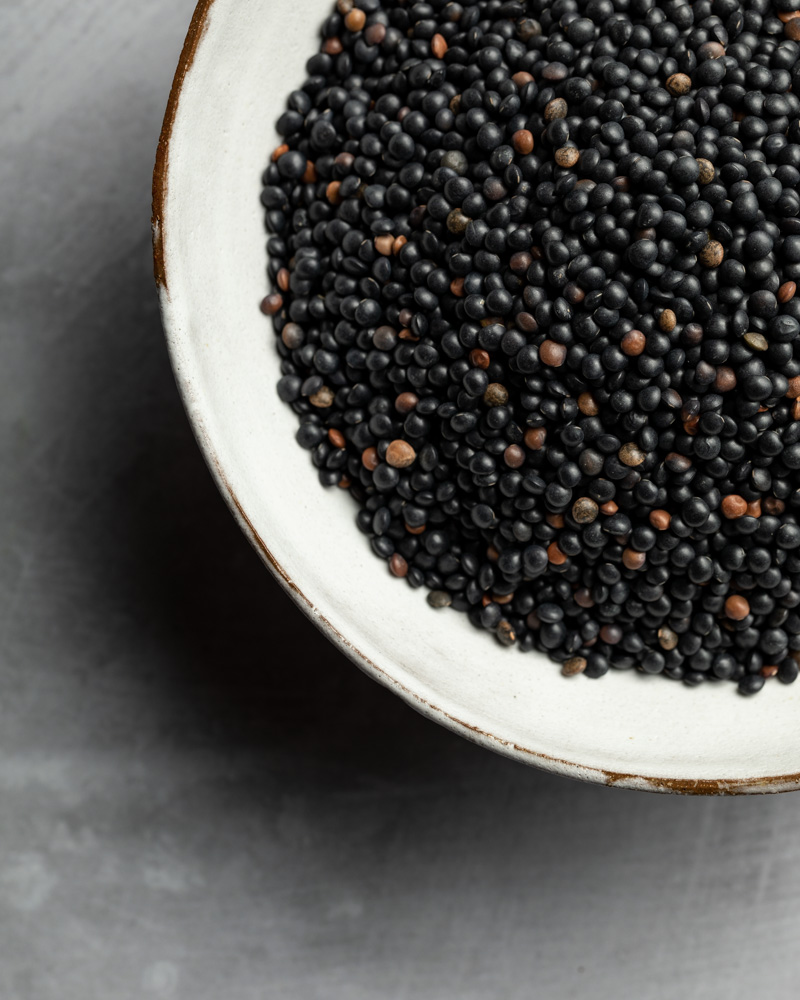
Black lentils, also known as beluga lentils due to their resemblance to beluga caviar, are a fabulous legume perfect for use in hearty salads such as this. They have a deliciously earthy flavor. Unlike larger beans, lentils don’t require presoaking and have a quick cooking time. Likewise, they retain their shape when cooked, which gives you some substance to sink your teeth into. Lentils are also a great source of protein. Indeed, a 1 cup serving provides 12 grams of protein, a fun fact which you can mention to all of your well-meaning relatives wondering how you get enough protein as a vegan!

close up of black lentils - black lentil pomegranate salad

Pomegranates

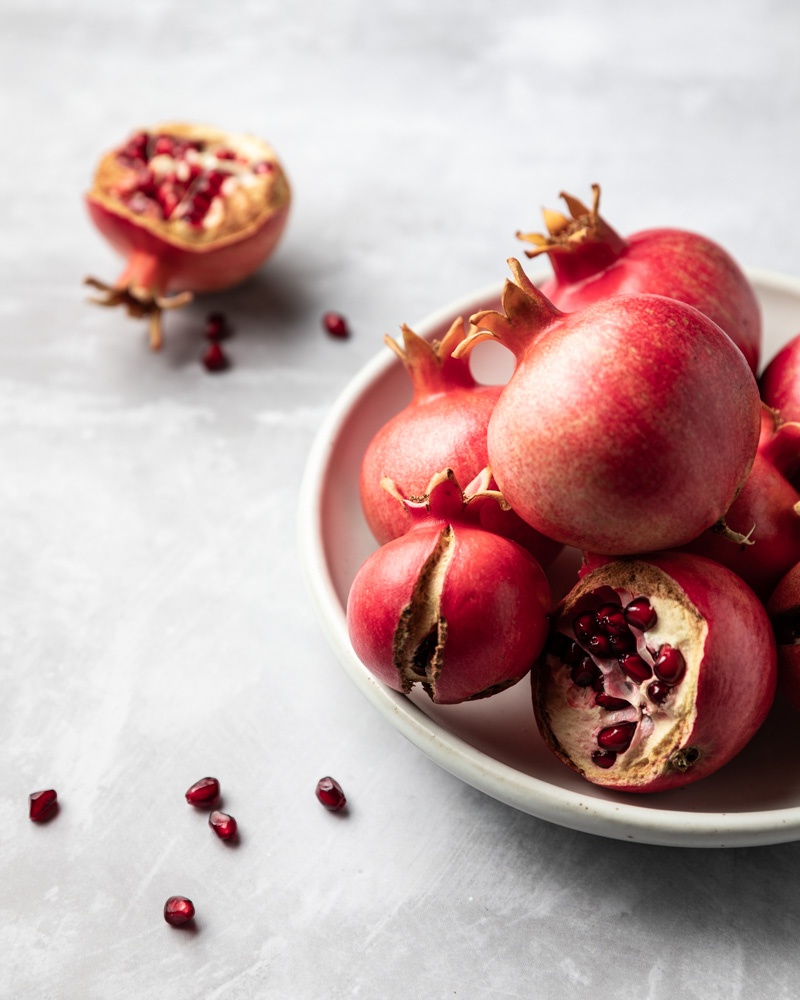
In my opinion, there is no other fruit quite as festive as the pomegranate. Underneath a hard and glossy red rind lies a plethora of jewel-like seeds, but first you have to get to them! It seems like there are a million different tricks to easily open pomegranates, but you can find a very helpful and thorough tutorial here. Although they can be time consuming to prepare, pomegranate seeds, also known as arils, are absolutely worth the effort. The rich flavor of the seeds are a lovely combination of sour and sweet. Additionally, the seeds provide a bright, juicy crunch when bitten into. An excellent source of vitamin C and antioxidants, this autumnal fruit has been shown to have anti-inflammatory properties and can improve digestion. Here, their juicy tartness pairs well with the earthiness of lentils and tahini.

Pomegranate platter - black lentil pomegranate salad

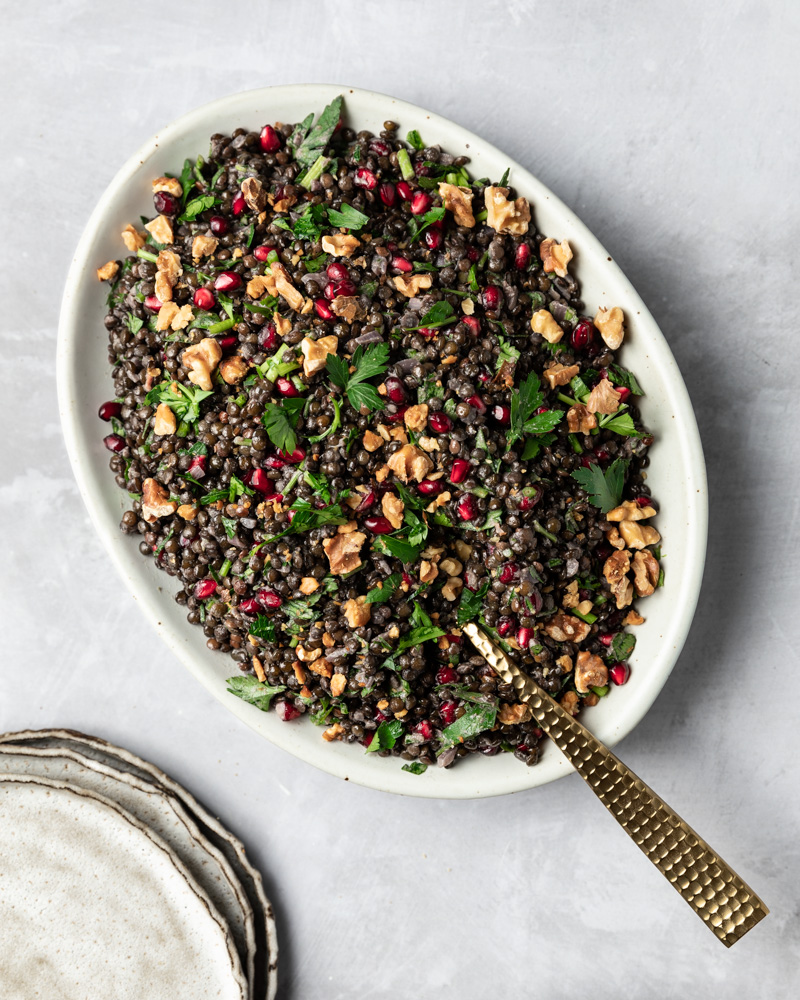
A Festive Holiday Side Dish

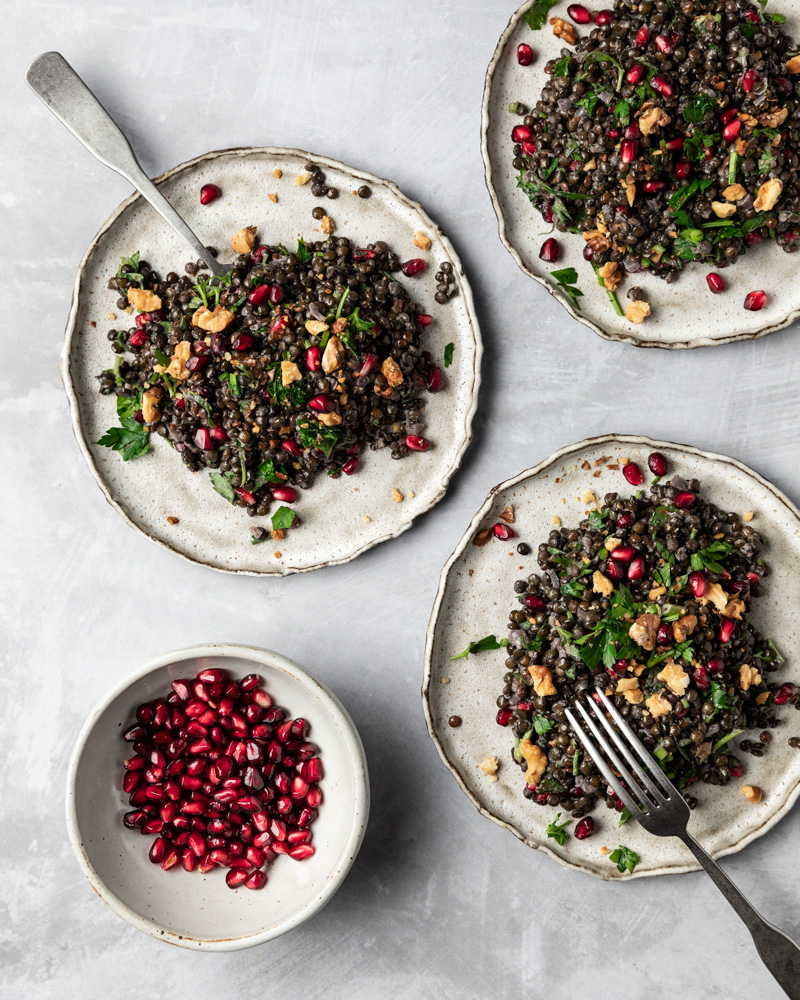
This Black Lentil Pomegranate Salad has all the makings of a wonderfully festive dish. The base of black lentils is slathered in a creamy lemon tahini dressing, and is a perfect counterpoint to tart, juicy pomegranate seeds. The salad is finished off with crunchy toasted walnuts and a vibrant sprinkling of parsley. Hearty, flavorful, and fresh, this vegan side dish will make a beautiful addition to your holiday table.

black lentil pomegranate salad on plates

Print
clock clock icon cutlery cutlery icon flag flag icon folder folder icon instagram instagram icon pinterest pinterest icon facebook facebook icon print print icon squares squares icon
black lentil pomegranate salad on plates

Black Lentil Pomegranate Salad

★★★★★ 5 from 1 reviews
  • Author: Alana Haldan
  • Prep Time: 25 minutes
  • Cook Time: 30 minutes
  • Total Time: 55 minutes
  • Yield: 8 servings 1x
Print
Pin

Description

Though they can be time consuming to prepare, pomegranate seeds, also known as arils, are an absolute treat to eat. An excellent source of vitamin C and antioxidants, this autumnal fruit has been shown to have anti-inflammatory properties and can improve digestion. Here, their juicy tartness pairs well with the earthiness of lentils and tahini.


Scale

Ingredients

  • ¼ cup plus 1 Tbsp olive oil, divided
  • 1 medium shallot, minced
  • 1 clove garlic, minced
  • 4 cups water
  • 2 cups dried beluga lentils, rinsed and drained
  • ½ cup lemon juice
  • ¼ cup tahini
  • ¼ tsp sea salt
  • 2 cups walnuts, toasted and roughly chopped
  • 1 bunch parsley, finely chopped
  • Seeds from 3 medium pomegranates, about 2 to 3 cups

Instructions

  1. In a medium pot, heat 1 Tbsp of the olive oil over medium heat. When oil begins to shimmer, add shallot and garlic and and stir until fragrant and golden, about 30 seconds to 1 minute.
  2. Add water and lentils and stir well to combine. Bring to a simmer then cover and cook over low heat until tender but still firm, about 20 to 25 minutes. Remove from heat, drain any excess water if necessary, and spread out on a sheet pan to cool.
  3. Meanwhile, prepare the dressing. In a medium bowl, whisk together lemon juice and tahini until well combined and creamy. Slowly drizzle in remaining ¼ cup of the olive oil, whisking constantly until dressing is smooth and emulsified. Add salt and stir to incorporate.
  4. Add cooled lentils to a large bowl with dressing, walnuts, and parsley. Toss well to incorporate and to coat all the ingredients with dressing. Add the pomegranate seeds and gently stir to combine.

Did you make this recipe?

Tag @sproutsandkrauts on Instagram

Filed Under: Recipes, Salad, Side Dish

Fragrant Golden Rice

October 24, 2019 by Alana

Sometimes the simplest foods can turn out to be the most flavorful. Take this short grain brown rice, for example. On its own, rice can be relatively basic and bland. However, this fact makes rice a perfect sponge for any seasonings you wish to use. This Fragrant Golden Rice, transformed by turmeric, garlic, and ginger, becomes a beautifully delicious side dish.

Fragrant golden rice cooked in a dutch oven

Chances are you’ve heard of golden milk before. This flavorful Ayurvedic beverage has been all the rage for the past several years due to its anti-inflammatory benefits. I decided to take the flavors of golden milk in a savory direction by infusing them into short grain brown rice. In this recipe for Fragrant Golden Rice, this humble grain is elevated to new heights with the addition of fragrant spices added at the beginning of the cooking process. Turmeric, a great source of antioxidants and vitamins, gives the rice a striking golden hue. Garlic, ginger, coriander, and cumin round out the aromatic ingredient list. Not only would this rice pair wonderfully with a hearty curry or stew, but the bold spices make the rice flavorful enough to be enjoyed alone.

An arrangement of ingredients for Fragrant Golden Rice: short grain rice, garlic, ginger, coriander, cumin, turmeric, and salt

The Magic Of Oven Rice

While going to culinary school at Bauman College, I was first introduced to the concept of oven rice. After years of dealing with undercooked rice, overcooked rice, soggy rice, pots boiling over, and all the other annoyances of cooking rice on the stovetop, preparing rice in the oven was a total revelation to me. In a dutch oven, first cook the spices briefly on the stovetop to release their flavor compounds, then add water and bring to a boil. Next, add the rice and cover with a lid. Finally, place the dutch oven into a heated oven, then simply wait for the magic to happen.

Fragrant Golden Rice in a serving spoon

Adding the rice into boiling water rather than starting the cooking process cold ensures that the individual grains of rice retain a perfect, defined texture. Once removed from the oven, this golden rice has an ideal consistency. The plump grains have just the right amount of bite and firmness. This rice makes a wonderful companion for soups, stews, and curries (such as my Morroccan-Spiced Stew). I’m not usually an advocate for eating leftovers straight out of the refrigerator, but this golden rice is surprisingly delicious served cold. Use the cold or room temperature rice as a base for a buddha bowl, or sprinkle it on top of a salad. The best part is that you can use this oven rice method with any other spice combinations you like, so feel free to have fun and experiment with different flavors.

Fragrant Golden Rice in a serving bowl

Print
clock clock icon cutlery cutlery icon flag flag icon folder folder icon instagram instagram icon pinterest pinterest icon facebook facebook icon print print icon squares squares icon
Fragrant Golden Rice in a serving bowl

Fragrant Golden Rice

  • Author: Alana Haldan
  • Prep Time: 10 minutes
  • Cook Time: 1 hour 5 minutes
  • Total Time: 1 hour 15 minutes
  • Yield: 8 servings 1x
Print
Pin

Description

Simple brown rice is elevated to a new level with the addition of fragrant spices added at the beginning of the cooking process. Turmeric, a great source of antioxidants and vitamins, gives the rice a striking golden hue. Not only would this pair wonderfully with a hearty curry or stew, but the bold spices make the rice flavorful enough to be eaten alone.


Scale

Ingredients

  • 2 tsp coconut oil
  • 1 Tbsp grated ginger
  • 1 Tbsp minced garlic
  • 2 tsp coriander
  • 2 tsp cumin
  • 2 tsp turmeric
  • 4 cups water
  • 2 tsp sea salt
  • 2 cups short grain brown rice

Instructions

  1. Preheat oven to 375° F.
  2. In a large dutch oven, heat oil over medium heat. When oil shimmers, add ginger and garlic. Cook, stirring often, until fragrant and golden, about 30 seconds. Add the coriander, cumin, and turmeric and stir often until spices are fragrant, about 30 seconds to 1 minute.
  3. Add water and sea salt and stir well to combine. Increase heat and bring to a boil. Immediately add rice, stir well, and top with a tight-fitting lid. Alternatively, cover the dutch oven with parchment paper, then wrap tightly with aluminum foil. Immediately place in oven and bake until rice is tender and liquid has been absorbed, about 1 hour.
  4. Remove from oven, stir, replace cover, and let rest for 5 minutes. Fluff with a fork before serving.

Did you make this recipe?

Tag @sproutsandkrauts on Instagram

Filed Under: Recipes, Side Dish

Spicy Udon Noodle Soup

October 9, 2019 by Alana

Whenever there’s a question of what to have for dinner, soup will invariably be my resounding answer. Though I’ve always stood firmly in the “homemade is best” camp (I blame my childhood habit of watching episodes of Martha Stewart Living), sometimes I  just need a quick and easy meal. On those lazy evenings when I don’t feel like puttering around in the kitchen, this Spicy Udon Noodle Soup is my go-to dish.

What I love most about this Spicy Udon Noodle Soup is that it’s a super quick meal that I can throw together in a matter of minutes, using a few key items that I always keep in my pantry. A trio of ingredients come together to create a rich, powerful broth that is a perfect foundation ready to be customized. Thai Coconut Broth, together with a carton of chopped tomatoes and some hot chili oil form a spicy, sour, and creamy elixir.

Udon Soup Ingredients
The beauty of this recipe is that it will accommodate a wide variety of add-ins based on your personal preferences or whatever ingredients are lingering in your refrigerator. Here, diced onion and hearty chunks of tofu bulk up the recipe, but you could easily add in other vegetables like celery, cauliflower, or broccoli. Likewise, thick, chewy udon noodles perfectly compliment this spicy soup, but other types of pasta or rice would also work well if that’s all you have on hand.

Spicy Udon Noodle Souo

Print
clock clock icon cutlery cutlery icon flag flag icon folder folder icon instagram instagram icon pinterest pinterest icon facebook facebook icon print print icon squares squares icon
Spicy Udon Noodle Souo

Spicy Udon Noodle Soup

  • Author: Alana Haldan
  • Prep Time: 5 minutes
  • Cook Time: 10 minutes
  • Total Time: 15 minutes
  • Yield: 4 servings 1x
  • Category: Soup
Print
Pin

Description

This vegan Spicy Udon Noodle Soup comes together in minutes, and makes a perfect quick and easy dinner. Coconut broth, chopped tomatoes, and hot chili oil form a spicy, sour, and creamy elixir that is a flavorful backdrop for tofu, vegetables, and chewy udon noodles.


Scale

Ingredients

  • 4 cups Ocean’s Halo Thai Coconut Broth
  • 26 oz box Pomi Chopped Tomatoes
  • 1/4 cup Lahtt Sauce Hot All-Purpose Chili Oil, plus more for garnish (optional)
  • 10 oz firm tofu, diced
  • 1 yellow onion, diced
  • 4 servings udon noodles, prepared according to package directions (see note)
  • 1/2 cup roughly chopped cilantro

Instructions

  1. In a medium pot, combine broth, chopped tomatoes, and chili oil and stir to combine. Over high heat, bring to a boil then lower heat to simmer.
  2. Add tofu and onion and simmer until softened, about five minutes.
  3. Divide prepared udon noodles among four bowls and top with hot soup.
  4. Top with cilantro and more chili oil if desired.

Notes

If possible, use frozen udon noodles. They can generally be found in Asian markets and have so much more body and texture than dried udon.

Did you make this recipe?

Tag @sproutsandkrauts on Instagram

Filed Under: Recipes, Soup

Vegan Rainbow Coleslaw

August 22, 2019 by Alana

You may have heard the phrase “Eat The Rainbow”, a saying that’s a simple reminder to eat a wide variety of colorful produce each day. Certainly, I keep this mantra in mind every time I’m putting together a meal. In fact, that saying is what initially inspired me to create this Vegan Rainbow Coleslaw.

Rainbow Vegetables

One of the beautiful things about nature is the fact that different colors are clues about different nutrients that are present in foods. For example, purple coloring in fruits and vegetables like cabbage, eggplant, and blueberries indicate the presence of anthocyanins. This is an antioxidant compound that has been shown to have anti-cancer and anti-aging properties. On the other hand, yellow and orange hues point to the presence of beta-carotene, which promotes vision health and cell growth. Ultimately, a wide spectrum of colors in your diet indicates that you’re eating a wide range of nutrients as well.

Cashew Sauce

This Vegan Rainbow Coleslaw is a mix of shredded cabbage, peppers, carrots, and green onion. This confetti of fresh rainbow vegetables is all tied together by a tangy, slightly spicy sauce with an Asian flair. Cashew butter is the backbone that gives this sauce a luscious creaminess while sriracha adds a pleasant burn. Most noteworthy is the addition of Wildbrine Live Shots, a fermented probiotic brine. However, if you’re unable to find this product in your local store, feel free to use rice vinegar instead.

Vegan Rainbow Coleslaw

Print
clock clock icon cutlery cutlery icon flag flag icon folder folder icon instagram instagram icon pinterest pinterest icon facebook facebook icon print print icon squares squares icon
Vegan Rainbow Coleslaw

Vegan Rainbow Coleslaw

  • Author: Alana Haldan
  • Prep Time: 15 minutes
  • Total Time: 45 minutes
  • Yield: 6 servings 1x
  • Category: Side Dish
Print
Pin

Description

This Vegan Rainbow Coleslaw is a perfect side dish for summer cookouts. A confetti of fresh rainbow vegetables is all tied together by a tangy, slightly spicy sauce with an Asian flair. Cashew butter is the backbone that gives this vegan sauce a luscious creaminess, while sriracha adds a pleasant burn.


Scale

Ingredients

  • 1/2 medium head of cabbage (approximately 1 lb), cored and thinly sliced
  • 2 carrots, peeled and julienned
  • 1 red bell pepper, julienned
  • 1 yellow bell pepper, julienned
  • 1 jalapeno pepper, finely diced
  • 2 green onions, thinly sliced
  • 1/4 cup raw unsalted cashew butter
  • 3 Tbsp Wildbrine Zesty Thai Live Shot (see note)
  • 3 Tbsp sriracha
  • 2 Tbsp coconut aminos

Instructions

  1. In a large bowl, combine cabbage, carrots, peppers, and green onions, tossing well to combine.
  2. In a small bowl, combine cashew butter, live shot, sriracha, and coconut aminos. Whisk well until fully combined.
  3. Pour dressing over vegetable mixture and toss well to coat. Refrigerate and let sit at least 30 minutes prior to serving to allow flavors to combine.

Notes

Wildbrine Live Shots can be found online or in select grocery stores. If you’re unable to find it, you can use rice vinegar instead.

Did you make this recipe?

Tag @sproutsandkrauts on Instagram

Filed Under: Recipes, Salad, Side Dish

Zucchini Noodles With Walnut-Parsley Pesto

August 8, 2019 by Alana

Anyone with a summer garden has probably experienced that overwhelming moment when the zucchini starts to pile up far too quickly. From salads and stir-fry to muffins and bread, there are a plethora of ways to try to utilize zucchini, but perhaps nothing is more fun than creating zucchini noodles.

Zucchini being spiralized and turned into noodles

Out of all my kitchen tools, my spiralizer is one of my favorites. I first discovered this fun tool when I became vegan and was incorporating more raw vegetables into my diet. The spiralizer is an amazing tool that enables you to create “noodles” from a vast array of different vegetables. Zucchini noodles (also known as zoodles) are perhaps the most popular spiralized vegetable, but plenty of other vegetables, such as sweet potatoes, daikon radishes, beets, and butternut squash also make excellent “noodles”.

Parsley-Walnut Pesto Ingredients

This raw recipe features zucchini noodles coated in a vibrant walnut-parsley pesto sauce. This recipe puts a spin on traditional pesto by using walnuts and parsley in place of the traditional pine nuts and basil. Additionally, pesto usually includes Parmesan cheese, but this vegan version relies on nutritional yeast for a cheesy tang. Nutritional yeast, also known as “nooch”, is a deactivated yeast often used as a condiment in vegan and vegetarian cooking. The yellow powder imparts a cheesy, umami flavor and is also a great source of protein and B vitamins.

Walnuts, an extremely nutrient-dense nut, are a great source of antioxidants and omega-3 fatty acids. They’re also more cost-effective than pine nuts. Flat-leaf parsley has a fresh, fragrant flavor, and is extremely rich in chlorophyll, carotenes, and other vitamins and minerals. The beauty of this recipe is that it is so simple, fresh, and customizable. You can switch it up by combining other spiralized vegetables with the zucchini noodles or using a mixture of your favorite fresh herbs in your pesto. Use whatever is most fresh and simply let your garden be your guide.

Zucchini Noodles With Raw Walnut-Parsley Pesto

Print
clock clock icon cutlery cutlery icon flag flag icon folder folder icon instagram instagram icon pinterest pinterest icon facebook facebook icon print print icon squares squares icon
Zucchini Noodles With Walnut-Parsley Pesto

Zucchini Noodles With Walnut-Parsley Pesto

  • Author: Alana Haldan
  • Prep Time: 20 minutes
  • Total Time: 36 hours 20 minutes
  • Yield: 4 servings 1x
  • Category: Side Dish
Print
Pin

Description

The spiralizer is an amazing tool that enables you to create “noodles” from a vast array of different vegetables. While this recipe uses zucchini, many other vegetables would work well here, including cucumber, sweet potato, and butternut squash.


Scale

Ingredients

  • 2 cups parsley, roughly chopped and packed
  • 1/3 cup walnuts, soaked overnight and dehydrated at 100°F  until dry, about 24 to 36 hours (see note)
  • 1/4 cup lemon juice
  • 3 Tbsp nutritional yeast, plus more for garnish
  • 2 cloves garlic, chopped
  • 1/2 tsp sea salt
  • 1/4 cup olive oil
  • 4 medium zucchinis, spiralized and roughly chopped (see note)

Instructions

  1. In a food processor, combine parsley, walnuts, lemon juice, nutritional yeast, garlic, and sea salt and pulse until combined but still chunky.
  2. With the processor running, slowly drizzle in olive oil and continue processing until well blended. Stop to scrape down the sides of the bowl as needed. Continue processing until you reach your desired consistency.
  3. In a large bowl, combine zucchini noodles and pesto. Toss well until noodles are fully coated and pesto is well combined.
  4. Garnish with nutritional yeast.

Notes

If you don’t have the time to soak and dehydrate your nuts, and you aren’t concerned with keeping the recipe completely raw, you can used roasted walnuts instead.

How to spiralize:

  1. Peel produce if necessary, then slice off ends to create a flat surface.
  2. Secure spiralizer to counter top.
  3. Decide which blade you want to use.
  4. Align center of vegetable or fruit to the central coring blade, then secure the other end to spokes of the handle.
  5. Crank handle away from you to push produce through the blade.
  6. Roughly chop noodles to cut up any extremely long spirals.

Did you make this recipe?

Tag @sproutsandkrauts on Instagram

Filed Under: Recipes, Side Dish

Vegan Poke Bowl

May 9, 2019 by Alana

Over the past few years, there has been a ton of hype surrounding poke bowls, but I always missed out on the experience because I don’t eat fish. So, I developed my own version with a fun replacement for the usual seafood. Brimming with deliciously healthy ingredients, this beautiful Vegan Poke Bowl is a perfect meal for a warm spring day.

Vegan Poke Bowl Ingredients

Adding A Vegan Twist

A traditional poke bowl is a Hawaiian staple usually consisting of sushi rice, a variety of accompaniments like avocado, green onions, and ginger, and most importantly, chunks of raw, marinated fish. In fact, the word poke, meaning “to cut”, refers to the slicing style of the cubes of fish. Obviously, as a vegan, I knew I would leave the fish out of the equation, but I wanted to replace it with something a bit more creative than the typical tofu option. When I saw some vibrant watermelon radishes at the grocery store, inspiration struck! Not only is the color on point, but the crisp radish cubes provide the perfect canvas for a marinade of rice vinegar, sesame oil, and ginger.

Jade Pearl Rice

The use of Jade Pearl Rice brings the beauty of this bowl up to another level. Bamboo extract infuses this stunning sushi-style rice, which gives it a delicate, grassy taste and aroma as well as this gorgeous green hue. Of course, you could opt for another kind of rice instead, but if you can get ahold of this, it’s definitely worth it!

Vegan Poke Bowl

This vegan poke bowl is a vibrant marriage of strong flavors. Resting on a fluffy bed of bamboo rice, the marinated watermelon radishes are the star of the show. The bowl is then loaded with crunchy veggies and tender edamame. Finally, kimchi and a drizzle of avocado wasabi cream finish off the dish with a kick.

Vegan Poke Bowl

Print
clock clock icon cutlery cutlery icon flag flag icon folder folder icon instagram instagram icon pinterest pinterest icon facebook facebook icon print print icon squares squares icon
Vegan Poke Bowl

Vegan Poke Bowl

  • Author: Alana Haldan
  • Prep Time: 25 minutes
  • Cook Time: 20 minutes
  • Total Time: 4 hours 45 minutes
  • Yield: 6 servings 1x
  • Category: Main Course
Print
Pin

Description

While traditional Hawaiian poke bowls are typically made with pieces of tuna or salmon, this vegan version uses watermelon radish cubes, which provide the perfect canvas for a marinade of rice vinegar, sesame oil, and ginger.


Scale

Ingredients

  • 1/4 cup rice vinegar
  • 1/4 cup sesame oil
  • 2 Tbsp plus 1 tsp coconut aminos, divided
  • 1 Tbsp grated ginger
  • 2 1/2 lbs watermelon radishes, large diced
  • 1/2 tsp sea salt, divided
  • 2 cups Jade Pearl Rice (see note)
  • 2 Tbsp hot water
  • 1 tsp wasabi powder
  • 1 avocado, diced
  • 1 cup roughly chopped cilantro, medium packed
  • 2 limes, juiced
  • 3 cups edamame, prepared according to package directions
  • 1 1/2 cups sunflower sprouts
  • 3/4 cup pickled jalapeño slices
  • 3/4 cup kimchi (see note)
  • 1 large carrot, julienned
  • 1 green onion, thinly sliced
  • 1 1/2 tsp sesame seeds

Instructions

  1. In a large bowl, combine vinegar, sesame oil, 2 Tbsp of the coconut aminos, and ginger, whisking well to combine. Add radishes, stirring well, and refrigerate at least 4 hours.
  2. Meanwhile, prepare the rice. In a medium saucepan, combine 3 cups of water and 1/4 tsp of the salt and bring to a boil. Add rice, stirring well, and cover. Reduce heat to medium-low and simmer until rice is tender and water is absorbed, about 15 minutes. Remove from heat and let stand covered for a few minutes. Fluff and set aside.
  3. In a small bowl, whisk together hot water and wasabi powder until well combined. Let sit for about 5 minutes to let flavors release.
  4. In a food processor, combine wasabi, avocado, cilantro, lime juice, remaining 1 tsp of the coconut aminos, and remaining 1/4 tsp of the salt. Process until smooth and creamy, about 1 to 2 minutes.
  5. To serve, divide rice evenly among six bowls. Top with radishes, edamame, sunflower sprouts, jalapeño, kimchi, and carrot. Garnish with green onion and sesame seeds, and drizzle with avocado cream. 

Notes

Jade Pearl Rice can sometimes be found in specialty shops or health food stores, or can be purchased online from Amazon.com. If you can’t find Jade Pearl Rice, feel free to substitute your favorite rice or grain option.

I love Wildbrine Korean Kimchi because it is both vegan and gluten-free. If you can’t find it in a store near you, you can use your favorite vegan kimchi brand instead.

Did you make this recipe?

Tag @sproutsandkrauts on Instagram

Filed Under: Main Course, Recipes, Salad

Vegan Cream of Asparagus Soup

April 13, 2019 by Alana

There is something slightly magical about those first moments of spring, when the dark, cold days of winter give way to hopeful new growth. As a firm believer in eating with the seasons, I feel such excitement when springtime produce finally starts to appear, and to me, nothing says spring quite like asparagus. When I saw the bright green stalks peaking up through the soil in my garden, I was instantly inspired to create this Vegan Cream of Asparagus Soup. Bright, delicate, and silky smooth, this soup is like springtime in a bowl.

Freshly Picked Asparagus

Nutritional Highlights

Given their delicate, slender appearance, it can be surprising to learn just how much nutrition is packed into stalks of asparagus. For starters, compared to other vegetables, asparagus is relatively high in protein, with almost half of their calories coming from protein. Asparagus is also an excellent source of a wide variety of vitamins and minerals, such as B-Complex vitamins, vitamin C, copper, and iron. Especially intriguing is the high concentration of phytonutrients present in asparagus. For example, glutathione and rutin have antioxidant properties, while asparagus saponins have been shown to inhibit inflammation.

Vegan Cream of Asparagus Soup

Traditionally, a soup like this would most likely be rich and creamy due to copious amounts of dairy included in the recipe. However, this beautiful bowl of Vegan Cream of Asparagus Soup relies on a simple cashew cream to create a luscious, velvety texture. Not only do the cashews add a delicious flavor and texture, but they amp up the nutritional profile of this dish as well. Cashews are a great source of monounsaturated fats derived from oleic acid, which is known to be protective against cancer and heart disease. They also have an ample amount of protein, with each 1/4 cup serving providing over 7 grams of protein. Additionally, cashews are a good source of many minerals, including copper, magnesium, zinc, and iron.

Vegan Cream of Asparagus Soup

Taking advantage of seasonal produce at the peak of freshness, this Vegan Cream of Asparagus Soup makes for a satisfying and health-supportive recipe. Give it a try and let me know what you think!

Print
clock clock icon cutlery cutlery icon flag flag icon folder folder icon instagram instagram icon pinterest pinterest icon facebook facebook icon print print icon squares squares icon
Vegan Cream of Asparagus Soup

Vegan Cream of Asparagus Soup

  • Author: Alana Haldan
  • Prep Time: 20 minutes
  • Cook Time: 30 minutes
  • Total Time: 4 hours 50 minutes
  • Yield: 6 servings 1x
  • Category: Soup
Print
Pin

Description

Bright, delicate, and silky smooth, this Vegan Cream of Asparagus Soup is like springtime in a bowl. Filled with the fresh flavors of asparagus, peas, lemon, and dill, this simple soup is rendered luxuriously creamy thanks to the addition of a cashew cream sauce.


Scale

Ingredients

  • 2 Tbsp olive oil
  • 2 yellow onions, thinly sliced
  • 2 ribs celery, diced
  • 1 tsp sea salt, divided
  • 1 1/2 cups raw unsalted cashews, soaked at least 4 hours
  • 5 cups vegetable broth, divided
  • 1/4 cup plus 1 Tbsp nutritional yeast
  • 3 bunches asparagus (about 3 lbs), trimmed and cut into 1 inch pieces
  • 1 cup peas
  • 4 cloves garlic, minced
  • 1 Tbsp capers
  • 1/2 tsp smoked paprika
  • 1/4 tsp cayenne pepper
  • 3 lemons, zested and juiced
  • 2 tsp white wine vinegar
  • 2 Tbsp finely chopped dill

Instructions

  1. In a large stock pot, heat oil over medium heat until shimmering. Add onions, celery, and 1/4 tsp of the salt. Stirring occasionally, cook until vegetables are softened and onion is translucent, about 15 minutes.
  2. Meanwhile, prepare the cashew cream. Rinse and drain the soaked cashews. In a high speed blender, combine cashews, 1 cup of the broth, and nutritional yeast. Blend on high until completely creamy, about 2 to 3 minutes. Place in a small bowl and set aside.
  3. Add asparagus, peas, garlic, capers, smoked paprika, cayenne pepper, and remaining 3/4 tsp of the salt to the stock pot. Cook until asparagus is tender, about 10 minutes.
  4. Add remaining 4 cups of the broth, lemon zest and juice, vinegar, and dill, stirring well to combine. Remove from heat and allow to cool to room temperature.
  5. Working in batches, puree the soup in a high speed blender until very creamy, about 1 to 2 minutes. Return to pot.
  6. Add cashew cream to the soup and stir well to combine. Rewarm over medium heat.

Did you make this recipe?

Tag @sproutsandkrauts on Instagram

Filed Under: Recipes, Soup

Moroccan-Spiced Stew With Garbanzo Beans And Cauliflower

March 1, 2019 by Alana

Here in California and in much of the country, we’re still in the throes of cold and stormy weather. If you ask me, the perfect way to combat the cold is to enjoy a warming bowl of stew or soup. Brimming with the bold flavors of harissa, preserved lemons, olives, and a wide assortment of spices, this Moroccan-Spiced Stew is the perfect winter meal!

Moroccan-Spiced Stew

Last Spring, I was lucky enough to have an overabundance of Meyer lemons growing in my garden. I decided to try my hand at making preserved lemons, which is a traditional ingredient used in Moroccan and Middle Eastern cooking. Essentially, preserved lemons are lemons that have been pickled in salt and their own juices. The simple preserving process involves quartering the lemons, rubbing them with salt, then packing them into jars. I used this recipe from Nourished Kitchen as a general guideline. The most important ingredient is patience, since the lemons need to ferment at room temperature for about a month.

preserved lemons being made

Lemons are always one of my favorite ingredients to use, but preserving them really amps up their flavor to another level. The sourness of the lemons becomes more mellow during the fermentation process. You can use the peels in their entirety because they soften during the preservation process. Thus, the citrus oils found in the lemon peels provide an explosion of complex flavors. While I have experimented with using preserved lemons in sweet applications, they really shine when used in more traditional applications such as this Moroccan-spiced stew.

Moroccan-Spiced Stew

An extensive use of spices is a hallmark of Moroccan cuisine. In fact, the famed Moroccan spice blend called ras el hanout is said to contain twenty-seven different spices. Spices such as cinnamon, cumin, ginger, and turmeric make an appearance here in this rich and warming Moroccan-spiced stew. Moroccan stews, also called tagines, typically contain meat, but here garbanzo beans and cauliflower take center stage and create a hearty base that lets the variety of spices truly shine.

Moroccan_Spiced Stew

Print
clock clock icon cutlery cutlery icon flag flag icon folder folder icon instagram instagram icon pinterest pinterest icon facebook facebook icon print print icon squares squares icon

Moroccan-Spiced Stew With Garbanzo Beans And Cauliflower

  • Author: Alana Haldan
  • Prep Time: 20 minutes
  • Cook Time: 40 minutes
  • Total Time: 60 minutes
  • Yield: 6 servings 1x
  • Category: Dinner
Print
Pin

Description

This recipe makes extensive use of the spices and condiments typical of Moroccan cuisine. Moroccan stews, also called tagines, usually contain meat, but here garbanzo beans and cauliflower take center stage. Searing the cauliflower at the beginning of cooking may seem like an unnecessary step, but it actually provides a lot of extra flavor and texture to the entire meal.


Scale

Ingredients

  • ¼ cup coconut oil, divided
  • 1 medium head cauliflower, chopped
  • 1 large onion, diced
  • 3 stalks celery, diced
  • 3 carrots, diced
  • 1 tsp sea salt, divided
  • 1 tsp coriander
  • 1 tsp cumin
  • 1 tsp turmeric
  • ½ tsp ginger
  • ½ tsp sumac
  • ¼ tsp cinnamon
  • 28 oz can diced tomatoes
  • 4 cups vegetable broth
  • 2 15 oz cans garbanzo beans, rinsed and drained
  • 1 preserved lemon, rinsed, seeded, and roughly chopped (see note)
  • ½ cup green olives, roughly chopped
  • ¼ cup harissa
  • 1 medium lemon, zested and juiced
  • 2 Tbsp arrowroot
  • 2 Tbsp water
  • ½ bunch flat leaf parsley, chopped
  • ½ bunch cilantro, chopped

Instructions

  1. In a large dutch oven, heat 2 Tbsp of the oil over medium-high heat. When oil shimmers, add cauliflower and sear until golden and crispy, about 2 to 3 minutes. Flip and continue searing until all sides are crisped. When finished, place in a medium bowl and reserve.
  2. Over medium heat, melt remaining 2 Tbsp oil in dutch oven. Add onion, celery, carrots, and ½ tsp of the salt and stir well to combine. Cover, reduce heat, and cook until vegetables are softened, about 5 minutes.
  3. Add spices and remaining ½ tsp salt. Stir well and cook over medium-low heat until fragrant, about 5 minutes.
  4. Add tomatoes, reserved cauliflower, and broth. Bring to a boil, then reduce heat and simmer until cauliflower is tender, about 15 minutes.
  5. Add garbanzo beans, preserved lemon, green olives, harissa, lemon zest, and lemon juice and stir well to combine. Cook on medium heat until heated through, about 5 minutes.
  6. In a small bowl, whisk arrowroot and water to create a slurry. Stir into the stew and cook until slightly thickened, about 3-5 minutes.
  7. Stir in parsley and cilantro until well combined.

Notes

Preserved lemons can generally be found in specialty markets and some grocery stores. If you have trouble finding them, you can substitute the zest and juice of one additional lemon.

Did you make this recipe?

Tag @sproutsandkrauts on Instagram

Filed Under: Main Course, Recipes

Raspberry Coconut Kanten

February 13, 2019 by Alana

With Valentine’s Day quickly approaching, love is in the air. This is a perfect time to treat your loved ones (and yourself) to a sweet delicacy, and this Raspberry Coconut Kanten certainly fits the bill. Not only is this dessert simple to prepare, but it is visually stunning as well. The vibrant red of the raspberries is striking against the stark white coconut cream. Although Valentine’s Day is often synonymous with chocolate, I wanted to create a lighter and brighter dessert  to highlight the natural beauty and sweetness of fruit.

Raspberry Coconut Kanten Close Up

The secret to this dessert is agar agar flakes, which is also known in Japan as kanten and is traditionally used in Japanese desserts. Though this ingredient may sound mysterious, it is simply an odorless, tasteless substance made from sea vegetables. Due to its natural thickening and gelling properties, agar agar is a perfect vegan substitute for gelatin. You can typically find agar agar in Asian markets and health food stores, or you can easily purchase it online. This Raspberry Coconut Kanten makes wonderful use of this fun ingredient. The agar agar flakes allow the coconut milk to set up into a firm, creamy custard, which pairs wonderfully with tart raspberry chia pudding to make a perfect vegan treat for Valentine’s Day.

Raspberry Coconut Kanten

Print
clock clock icon cutlery cutlery icon flag flag icon folder folder icon instagram instagram icon pinterest pinterest icon facebook facebook icon print print icon squares squares icon
Raspberry Coconut Kanten

Raspberry Coconut Kanten

  • Author: Alana Haldan
  • Cook Time: 11 minutes
  • Total Time: 5 hours 36 minutes
  • Yield: 6 servings 1x
  • Category: Dessert
Print
Pin

Description

The secret to this dessert is agar agar, known in Japan as kanten, an odorless, tasteless substance made from sea vegetables. Traditionally used in Japanese desserts, agar agar has thickening and gelling properties that make it a perfect vegan substitute for gelatin. You can typically find agar agar in Asian markets and health food stores.


Scale

Ingredients

  • 1 (13.5-ounce) can unsweetened full fat coconut milk
  • 3 Tbsp sugar, divided
  • 1 1/2 Tbsp agar agar flakes (see note)
  • 2 cups raspberries (see note)
  • 1/2 cup water
  • 1/4 cup lemon juice
  • 1/2 cup chia seeds

Instructions

  1. In a small pot, combine coconut milk and 1 Tbsp of the sugar and bring to a simmer over medium heat. Whisk until sugar is dissolved, about 1 minute.
  2. Add agar agar flakes and whisk well to combine. Bring to a boil over high heat, then reduce heat and simmer until agar agar is fully melted, about 5 minutes.
  3. Remove from heat and divide mixture evenly among six ramekins or small bowls (see note). Place in refrigerator and chill until firm, about 1 hour.
  4. In a small pot, combine raspberries, water, lemon juice, and remaining 2 Tbsp sugar and bring to a simmer over medium heat. Cook until sugar is dissolved and berries are broken down, about 5 minute. Remove from heat, pour into a medium bowl, and let cool slightly, about 5 minutes. Pour in chia seeds and stir well to combine. Let sit until mixture is somewhat thickened, about 15 to 20 minutes.
  5. Remove ramekins from refrigerator and fill evenly with the chia mixture. Place ramekins back in refrigerator and chill until chia mixture is firm, at least 4 hours or overnight.

Notes

If you have trouble finding agar agar flakes at your local health food store or Asian market, you can order them online.

Because raspberries are currently out of season, I opted to use frozen raspberries instead. When in season, fresh raspberries would work equally well in this recipe.

When choosing your serving vessels, note that each serving is approximately 1/2 cup.

Did you make this recipe?

Tag @sproutsandkrauts on Instagram

Filed Under: Dessert, Recipes

Purple Barley Romanesco Salad

January 30, 2019 by Alana

I’m all about eating seasonal produce, so when this romanesco was ready to be picked from my garden, I knew I wanted to build a recipe around this gorgeous vegetable. Thus, this Purple Barley Romanesco Salad was born!

Romanesco

Romanesco is in the brassica family, along with other cruciferous vegetables such as cabbage, cauliflower, and Brussels sprouts. Similar in taste and texture to broccoli and cauliflower, romanesco is delicious roasted, sautéed, steamed, or even raw. But unlike broccoli or cauliflower, romanesco has an incredibly vibrant chartreuse hue and a fractal-like appearance, making it a very visually dramatic vegetable! Just looking at it puts a smile on my face. Here in California, romanesco is currently in season, so look for it at your local farmers market. If you can’t find it, don’t worry. Cauliflower would make a great substitute in this recipe.

Purple Barley

Barley is a common grain that I’ve been eating for years, so I was excited to discover a new twist on it in the form of purple barley. Not only does this ingredient give the Purple Barley Romanesco Salad more visual interest, but it also amps up the nutrition level. The purple color comes from anthocyanins, an antioxidant which fights free radical damage and is also thought to have anti-inflammatory and anti-cancer benefits. In addition to the health benefits, I also find the texture to be a bit heartier than regular barley, making it a great choice for a grain salad.

Purple Barley Romanesco Salad

Purple Barley Romanesco Salad is a hearty dish perfect for winter. While this dish is meant to be served warm, leftovers are equally delicious cold right out of the refrigerator.

Print
clock clock icon cutlery cutlery icon flag flag icon folder folder icon instagram instagram icon pinterest pinterest icon facebook facebook icon print print icon squares squares icon
Purple Barley Romanesco Salad Close Up

Purple Barley Romanesco Salad

  • Author: Alana Haldan
  • Prep Time: 20 minutes
  • Cook Time: 25 minutes
  • Total Time: 45 minutes
  • Yield: 6 servings 1x
  • Category: Salad
Print
Pin

Description

A hearty salad perfect for winter, this meal beautifully combines the earthy flavors of purple barley, romanesco, and mushrooms with the salty tang of capers and sherry vinegar. With it’s dramatic color and shape, romanesco is the star of this hearty grain salad that’s equally delicious served warm or cold.


Scale

Ingredients

  • 1 1/2 cups semi-pearled purple barley, rinsed (see note)
  • 3 3/4 cups water
  • 1 1/4 tsp sea salt, divided
  • 1 romanesco, cut into florets
  • 1/4 cup olive oil, divided
  • 8 oz maitake mushrooms, torn into pieces (see note)
  • 2 cloves garlic, minced
  • 2 stalks celery, finely diced
  • 3 Tbsp capers
  • 3 Tbsp sherry vinegar
  • 1 bunch parsley, finely chopped

Instructions

  1. Preheat oven to 450°.
  2. In a medium saucepan, combine barley, water, and 1 tsp of the salt and bring to a boil. Reduce heat, cover and simmer until tender but still chewy, about 25 minutes. Drain excess water as needed and set aside.
  3. Meanwhile, prepare the romanesco. In a large bowl, combine romanesco, 1 Tbsp of the oil, and remaining 1/4 tsp salt. Stir well to coat. Place on a parchment lined baking sheet and bake until tender and crispy, about 15 to 20 minutes.
  4. Meanwhile, prepare the mushrooms. In a large sauté pan, heat 1 Tbsp of the oil over medium heat. Add mushrooms and cook, stirring occasionally, until softened, about 8 minutes. Add garlic and continue cooking until fragrant, about another 2 minutes.
  5. In a large bowl, add barley, romanesco, mushrooms, celery, and capers. Stir well to combine.
  6. In a small bowl, add sherry vinegar and remaining 2 Tbsp oil and whisk to combine. Pour over salad and toss to coat. Add parsley and gently stir to combine.

Notes

I purchased my purple barley online, but in a pinch regular barley can be used in this recipe.

Maitake mushrooms, also known as Hen of the Woods, are a beautifully delicate mushroom with a feathery texture. Rather than slicing them, simply use your hands to gently separate them into bite-sized pieces. If you have trouble finding maitake mushrooms near you, substitute with your mushroom of choice.

Did you make this recipe?

Tag @sproutsandkrauts on Instagram

Filed Under: Recipes, Salad

  • « Go to Previous Page
  • Go to page 1
  • Go to page 2
  • Go to page 3
  • Go to Next Page »

Primary Sidebar

Hi, I’m Alana

Welcome to Sprouts And Krauts! I'm a vegan chef that loves creating recipes with seasonal ingredients.
Read More →

Let’s Connect

  • Email
  • Facebook
  • Instagram
  • LinkedIn
  • Pinterest

Join Me!

Sign up for my free email newsletter and receive
A Beginner's Guide To Going Vegan

Thank you!

You have successfully joined our subscriber list. Check your email to download your free guide.

.

Disclosure

Sprouts And Krauts is a participant in the Amazon Services LLC Associates Program, an affiliate advertising program designed to provide a means for sites to earn advertising fees by advertising and linking to Amazon.com

Footer

I'm a natural chef and food photographer with a passion for vegan, plant-based cooking, fermentation, and raw foods. I hope to inspire and empower others to venture into the world of plant-based eating, just as I did years ago. Read More →

Find Me On…

  • Email
  • Facebook
  • Instagram
  • LinkedIn
  • Pinterest

Subscribe

Sign up now to receive email updates and a FREE digital guide to help you on your vegan journey!

Copyright © 2023 · Foodie Pro & The Genesis Framework  |  Privacy Policy  |  Terms Of Use  |  Disclaimer